Custom Testimonials for WordPress
In this tutorial, I will be teaching you how to create a Testimonials section on your WordPress website without using any testimonials plugin. There are certainly many different plugins you could use to accept and display testimonials on your site but sometimes these plugins don’t cut it especially if you want to really customize the info collected from the user or how to output the testimonial. This tutorial will use the following plugins:
- Custom Post Types UI to create the custom post type “Testimonials”
- Advanced Custom Fields to create the data for the testimonials
- Gravity Forms to create the form that accepts user input
- Gravity Forms + Custom Post Types to assign input to our CPT’s
Create the “Testimonials” Custom Post Type
Like any testimonials plugin, we will be creating a Testimonials custom post type. To do this, we will be using the Custom Post Types UI plugin, a very popular plugin that lets you create custom post types without code.
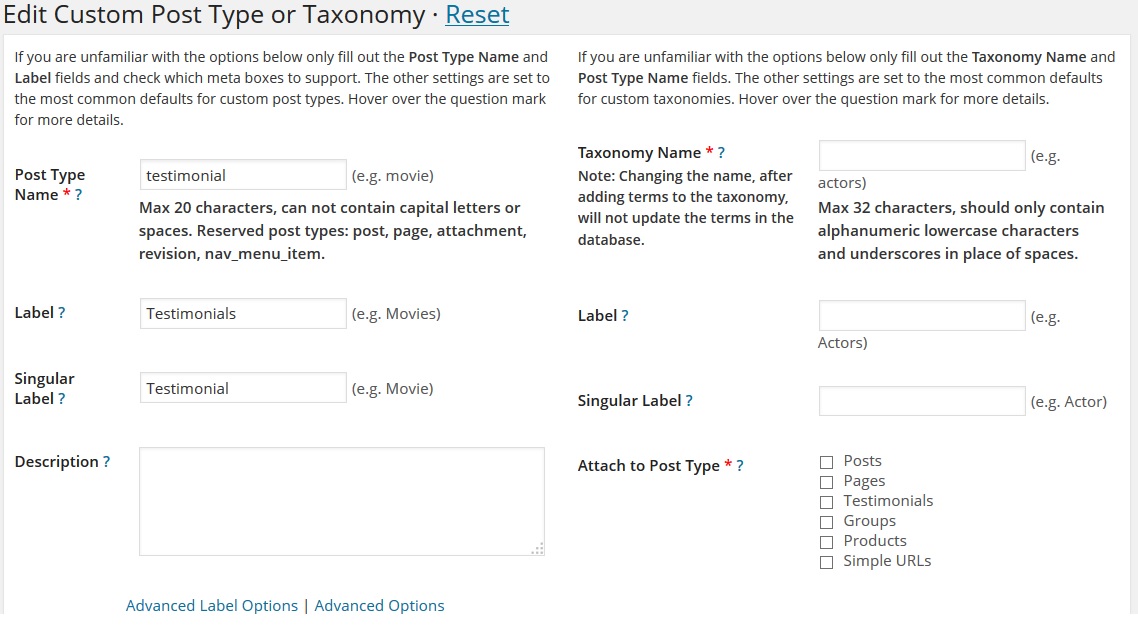
We won’t be worrying about creating any taxonomies because we don’t need to organize/categorize our testimonials. Set up your Testimonials custom post type like this:
- Post Type Name => testimonial
- Label => Testimonials
- Singular Label => Testimonial
- Description => Enter a description if you want
- Public => True
- Show UI => True
- Has Archive => False
- Exclude Fro Search => True
- Capability Type => Post
- Hierarchical => False
- Rewrite => True
- Custom Rewrite Slug => Defaults to “testimonial”
- With Front => True
- Query Var => True
- Menu Position => Not needed
- Show in Menu => True
- Menu Icon => Not needed but you can enter your own icon URL
- Suppports => None
- Built-in Taxonomies => None
The last two in this list will be set to none because we don’t need any of the standard WordPress fields and, since we don’t need any taxonomies, we don’t need the built-in options. Save your custom post type.
Create the “Testimonials” Custom Fields
Now that our custom post type is in place, we need to create some custom fields. This will be the data we want to collect when a new testimonial is submitted. Using Advanced Custom Fields, add a new custom fields group called “Testimonials”. Create three fields (Author, Website, Testimonial) with the following setups:
Fields
Field Label => Author
Field Name => author
Field Type => Text
Field Instructions => Name of person leaving testimonial
Required => Yes
Default Value => None
Placeholder Text => None
Prepend => None
Append => None
Formatting => No formatting
Character Limit => None
Conditional Logic => None
Field Label => Website
Field Name => website
Field Type => Text
Field Instructions => Website of the person leaving the testimonial
Required => Yes
Default Value => None
Placeholder Text => None
Prepend => None
Append => None
Formatting => No formatting
Character Limit => None
Conditional Logic => None
Field Label => Testimonial
Field Name => testimonial
Field Type => Text Area
Field Instructions => The testimonial
Required => Yes
Default Value => None
Placeholder Text => None
Character Limit => None
Rows => 8
Formatting => Convert new lines into
tags
Conditional Logic => None
Location
Rules => Show this field group if “Post Type” “is equal to” “testimonial”
Options
Order No. => 0
Position => High (after title)
Style => Standard (WP metabox)
Hide on screen => Check (hide) everything except Permalink
Create the Testimonials Form
We’re two-thirds there. We’ve create the custom post type and our custom fields. Now we just need to create the form. Again, we will be using Gravity Forms do this.
First thing is to install Gravity Forms. Once installed, you will install the Gravity Forms + Custom Post Types plugin. By default, Gravity Forms lets you create forms that can be used to create Posts. This is an amazingly powerful feature. However, it does not support custom post types. The Gravity Forms + Custom Post Types plugin integrates support for custom post types into Gravity Forms.
Once we’ve got those plugins installed, we can get to work on the testimonials form. Create a new form called “Testimonials”. We will be adding five fields to this form:
Title
We need to give our testimonial a title. In this tutorial, we are going to assign the author’s name as the title. In the form editor screen, add a title field (found under “Post Fields”). We will come back to this field in just a moment.
“Your Email”
This field isn’t necessary but we will collect the author’s email. You can leave this out if you prefer not to collect it. To add it, click the Email block under “Advanced Fields”. You can make it optional or required.
“Your Name/Website/Testimonial” (custom fields)
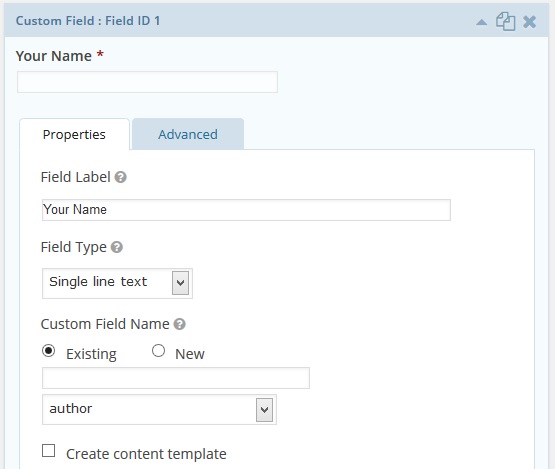
Here is where we get into the custom fields we set up. When the user enters his or her name in this field, we want it to be assigned to the “author” custom field we created before. Under the Post Fields area of the form editor, there is an option for “Custom Field”. Add one for the author’s name. Enter the field label, make it a single line text box, and assign it as an exiting custom field named “author”. It also needs to be a required field since we made this custom field required in Advanced Custom Fields. Repeat this step for “Your Website” (‘website’ custom field) and “Your Testimonial” (‘testimonial’ custom field). Note that you can change the form labels from “Your Name/Website/Testimonial” to whatever you want. As long as you assign the form field to the correct custom field you will be fine.
Back to Title
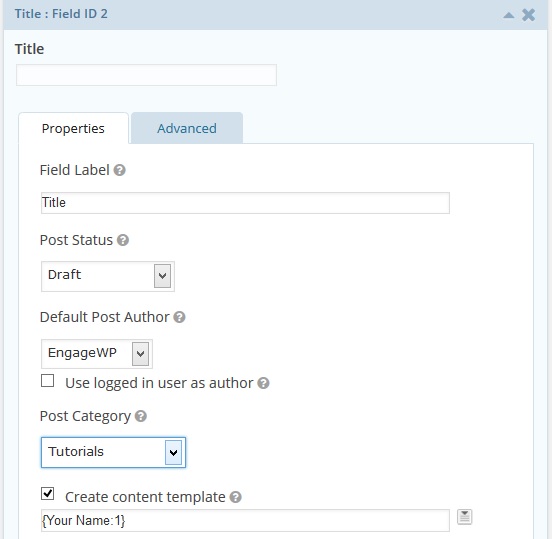
Now it’s time to go back and configure the Title field we first added to our form. You can set the title to something generic, like “Title”.
Next, you need to set the post status when someone submits a testimonial. Draft and Published are the most common. Draft will keep the testimonial in a draft status for you to manually publish and Published will automatically publish it. To prevent unwanted posts of any content type, you may want to set this to Draft.
You will also set the default post author, which can be any registered user with at least an Author role.
The Post Category is not important here since we aren’t assigning the form submission to a post (it’s a custom post type).
The “Create content template” section is important because we are setting the title to be the author’s name. Gravity Forms uses merge tags to use field values in other places. We will be using a merge tag to input the author’s name in this section, which will then assign the name to the title. There’s a little icon to the right of the input box that will let you choose a tag to insert. Select the tag of the “Your Name” (or whatever you named the Name form field). See the image below.
Next, we need to make the form save as a Testimonial custom post type. Under the Advanced tab, you will see the section that reads “Save As Post Type”. Select the Testimonials post type.
The final step in creating the Testimonials submission form is to set the title field visibility to “Admin Only” (also under the Advanced tab). This will hide the field to front-end users but will display the title in the admin.
Displaying Testimonials
To display the testimonials you are now accepting, you will need to create a custom template (archive and/or single) or modify an existing template. I will save display methods for another post and update this one when it’s available.
Conclusion
If you followed the directions in this post, you are now ready to roll with a simple testimonials system that can be easily built on. This post’s method and ideas can be used for any custom content, not just testimonials. If you have questions, feel free to post them in the comments!


Hi
I do see the post type for the title.
But I do not see the fields I set in ACF (custom fields).
What could I check?
Regards,
Simon
sir, can you please guide me to create simple testimonial with custom fields step by step.
This post is a step-by-step tutorial. Is there anything you need to have clarified?
Hey thanks, this looks great. I am looking specifically for the custom template how-to if you have that article or a recommendation for one. I noticed even WP Codex is a bit sparse on that… is it a php thing?
Great tutorial. Is there a way to put the name into the post title of the testimonial? Maybe better – auto populate the name when user is logged in?
You’ll need to use the gform_field_value_{parameter_name} filter. This post should help you out. Also, check out the documentation for the filter.
Hi!
Great tutorial!
I’ve done the first half but cannot see the custom fields. The custom fields are not in the Custom Post Types UI. Where can I edit/ add the custom fields?
Thanks for replying me.
Regards – Nuno
Hello, Nuno. To create the custom fields, you can use Advanced Custom Fields.
Hi,
Awesome tutorial which I like a lot. But I have two questions:
1) The Gravity Forms + Custom Post Types plugin is more than 2 years old! Is that not a potential risk? I can’t see the “Custom Field” section under the Post Fields area of the form editor, as you write! I’m using Gravity Forms Version 1.8.17.
2) When will you finish your tutorial with step-by-step guidance on how to display the testimonials? I would love to read your advice on how to create a custom template or modify an existing template.
Thank you 🙂
Hi Torben,
Thanks for commenting.
The Gravity Forms + Custom Post Types plugin has been in its current state for a while but it still works perfectly. It’s not a large plugin so updates aren’t as common as you see with other plugins (i.e. Gravity Forms). When the plugin is small and the code works, updates aren’t frequently required. Yes, there are plugins that display the message about not being updated within two years but this doesn’t necessarily mean that it’s bad to download.
I’ll make displaying the testimonials one of my next tutorials. Thanks for sharing your interest.
Ren
Oh, and that’s strange you aren’t able to see the Custom Field option in the Post Fields section. This button is a standard field option included in Gravity Forms. Can you link a screenshot to your Post Fields section in the form editor?
Hey Ren
Great post. I’m going to run with this for my company site. I’m a fellow WordPress designer and developer and I recently started using Gravity Forms on my company site and I love it.
Adding a page where my clients can go and submit a testimonial and having that data go to a Testimonials page is such an awesome idea.
Thanks again for your tutorial.
Hey Josh,
Thanks a lot for the feedback. I’m glad you liked it. This was definitely one of my favorite tutorials to write because it shows how awesome and powerful Gravity Forms really is. Creating post types of any type with G.F. is such an amazing benefit and it greatly extends the power of WordPress.
Cheers,
Ren