This tutorial shows you how to create a custom, line-item invoice system using the Gravity Forms plugin, Advanced Custom Fields Pro plugin and a few code snippets. I wanted to come up with a simple way to create my own invoicing method that integrated seamlessly with WordPress but I didn’t want to just install an existing invoice plugin and settle for that. Instead, I wanted something that I could tailor to my exact preferences.
Custom Invoice Tutorial Outline
Here’s a quick outline of what I’ll be covering in this tutorial.
- Create Invoice Custom Post Type
- Create Invoice Custom Fields
- Create Invoice Form in Gravity Forms
- Connect Form with PayPal
- Create Single Invoice Template
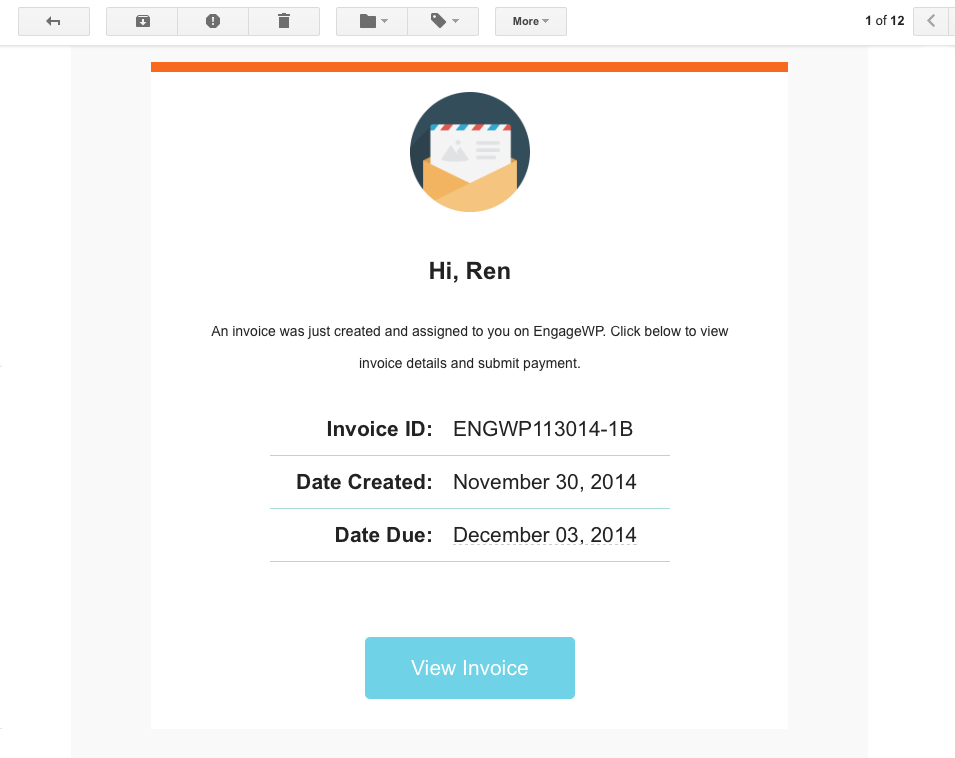
- Send Email to Client when New Invoice is Created
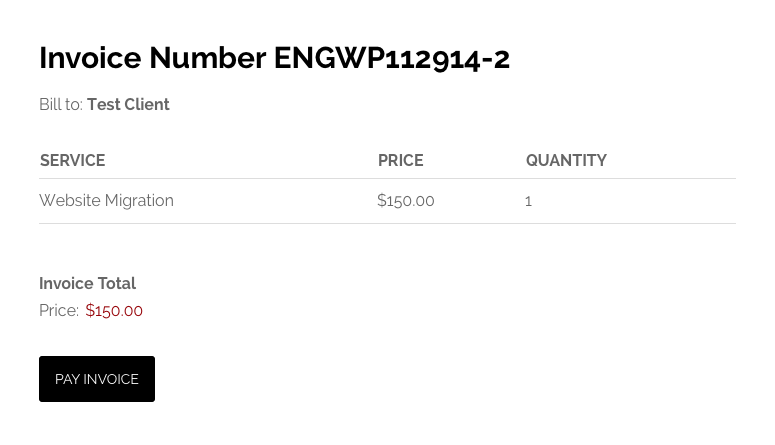
Things you’ll need for this tutorial include a Gravity Forms Developer license (includes the payment gateway add-ons needed to accept payment), Advanced Custom Fields Pro (it has the “Repeater” field for creating invoices with multiple products/services) and the Genesis Framework (optional but it will make presentation a lot easier). By the time we’re done, our finished product will look something like this:
Create Invoice Custom Post Type
The first step I want to take is creating the Invoice custom post type. You can use any method you want but the quickest will be to add the code I’ve already created (below). This code registers the Invoice post type without an archive and excluded from search queries on your site. This means that users will need to have a direct URL to access an invoice post.
Create Invoice Custom Fields
Next, we need to create some custom fields for the Invoice post type. For this tutorial (and all of my custom field work), I will be using Advanced Custom Fields Pro. There is a free version of Advanced Custom Fields but this particular project will require the Repeater field for adding multiple services to a single invoice.
For this tutorial, I’ve uploaded an importable JSON file for you to quickly import the fields. If you would like to use this file, you can download it from GitHub. That said, let’s walk through creating the fields manually.
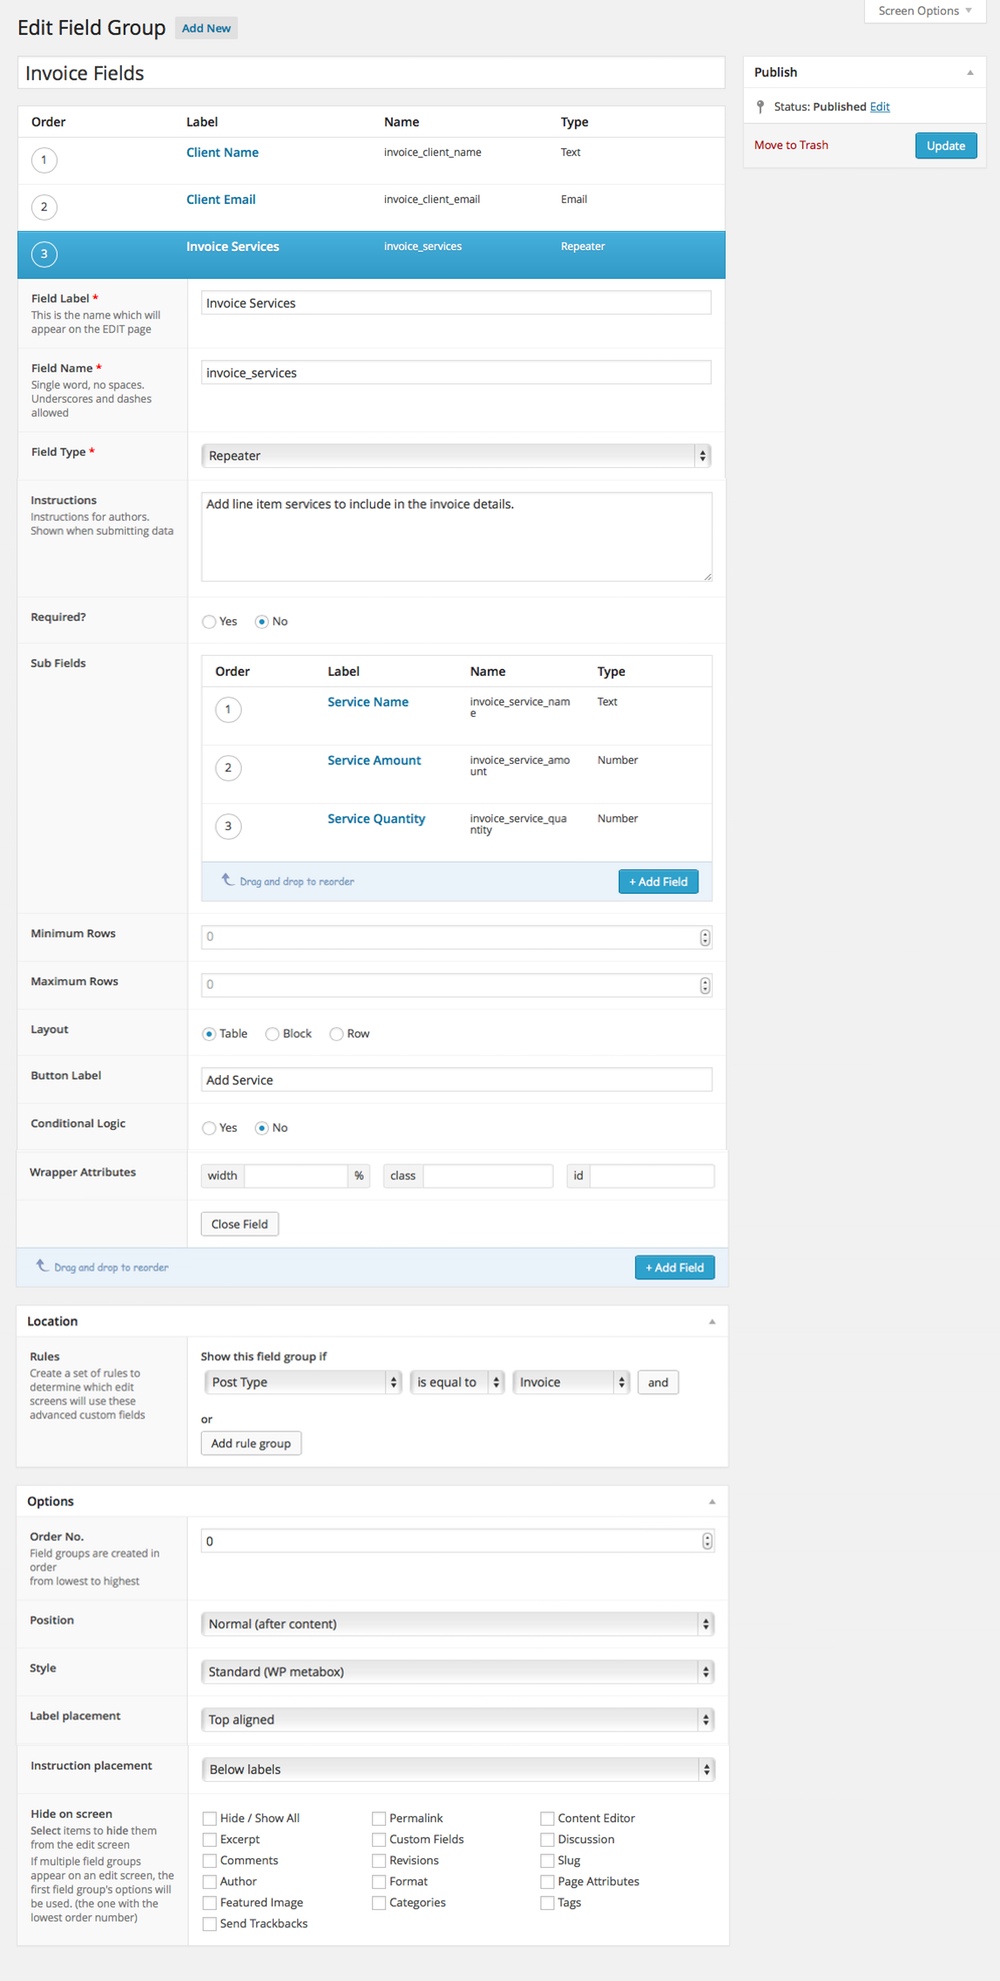
Create a field group called “Invoice Fields” or whatever you’d like to name it. In this group, we’ll be creating three fields (key is in parentheses):
- Client Name (invoice_client_name) – This is where we’ll add the client’s name.
- Client Email (invoice_client_email) – This is where we’ll add the client’s email address.
- Invoice Services (invoice_services) – A repeater field that will allow us to add multiple services to each invoice.
- Service Name (invoice_service_name) – The title of your service/product.
- Service Amount (invoice_service_amount) – Amount to bill client for each service.
- Service Quantity (invoice_service_quantity) – How many of each service/product.
Here’s a screenshot of what the fields groups setup should look like.
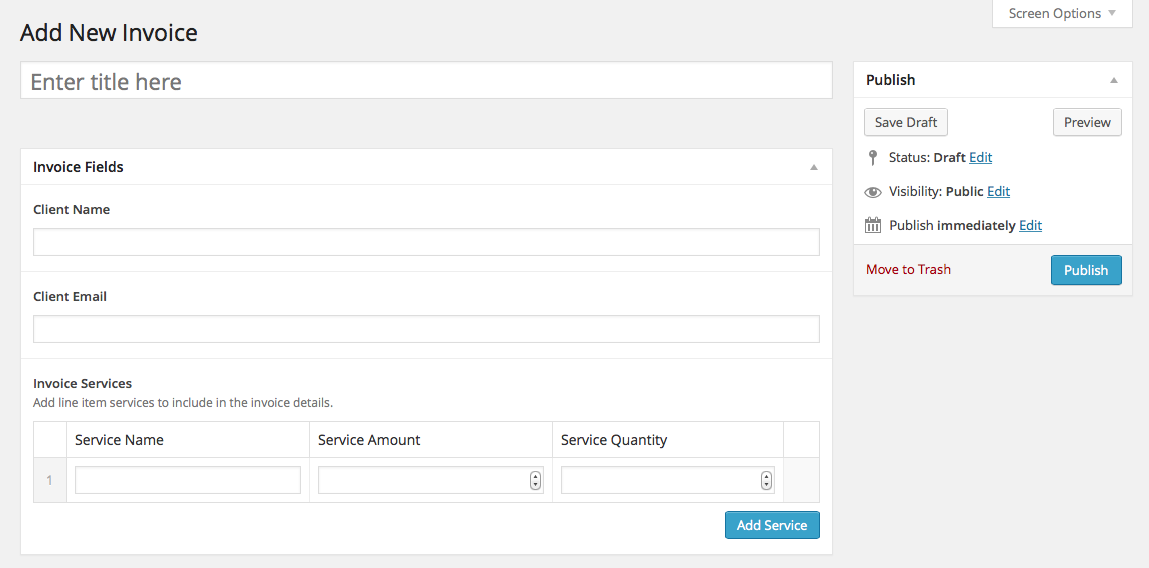
Once you’ve got your custom fields group set up properly, your “Add New Invoice” page will look like the image below. Thanks to the ACF Repeater field, we can add new invoice items by simply clicking “Add Service.”
Create Invoice Form in Gravity Forms
Up next is to create the form that will be used by your clients to pay an invoice. This is now where we’ll get into Gravity Forms. To begin, create a new form and call it “Invoice” or whatever you prefer. This may be one of the most advanced forms you’ve ever created with Gravity Forms but it’s not too bad. I’m going to break it up into different sections.
Form Editor
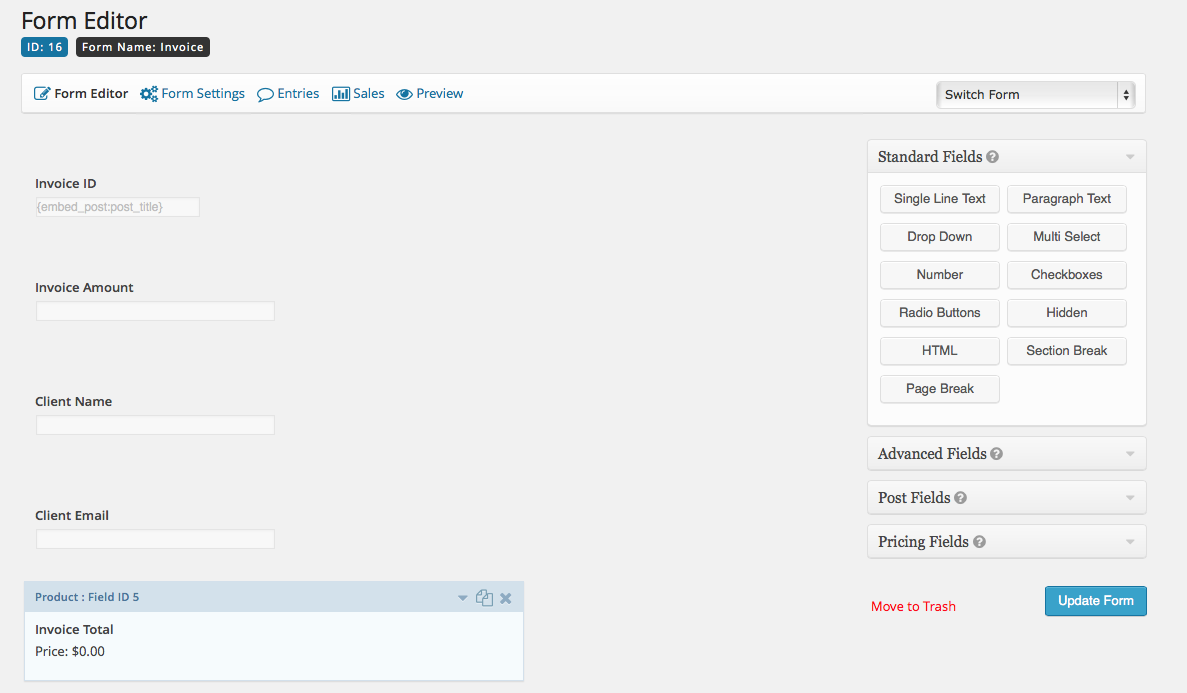
In the Form Editor, we need to create five form fields:
- Invoice ID – Add a Hidden field and call it “Invoice ID”. For this tutorial, we will be giving each new invoice a unique title of our choosing. For example, you could prefix your invoices and give them unique number sequences based on date (i.e. ENGWP112914-1 for prefix, date of 11/29/14 and “-1” for the first invoice of that day). This Gravity Forms field will store the title/id of the invoice. To get this to work, add the following Gravity Forms Merge Tag to “Default Value” under the field’s Advanced tab: {embed_post:post_title}
- Invoice Amount – This can be a simple text field. Under the Advanced tab, give it an admin label of invoice_amount. We also need to enable this field to be dynamically populated so check that box and enter as the parameter name invoice_amount. Also, make it viewable to admin only.
- Client Name – This will be almost the same as the Invoice Amount. However, we need to change the admin label and dynamic population parameter name to client_name. Also, make it viewable to admin only.
- Client Email – Again, the same as before but with client_email . Also, make it viewable to admin only.
- Invoice Total – Finally, this will be a product field (under the Pricing section). In the “Field Type” dropdown, select “Calculation” and paste the invoice_total merge tag in the formula area. The merge tag will look something like {invoice_amount:2} (the 2 is for the field ID). This will set the product’s price to be equal to the Invoice Amount field. In a bit, I’ll show you where this field gets its value from. For now, save your form because we’re ready to move on.
Form Confirmations
This area is optional. You can disable confirmations or just keep the default Gravity Forms confirmation (although I don’t know why you would). I always like to display a confirmation so I’ll set one up. Nothing too fancy here. I’m just going to confirm that payment for their invoice ID was received. This will happen after the client lands back on my site after completing payment in PayPal.
Your payment for Invoice ID <strong>{Invoice ID:1}</strong> was submitted successfully.
Form Notifications
As with the Confirmation, I’ll send a simple notice via email as well so the client has multiple confirmations that the payment was received. For the sake of demonstrating what’s possible with Gravity Forms merge tags, I’ll send a little more information to the client in the email.
{client_name:3},

Your payment was received successfully. Here are your invoice details:

Invoice ID - {Invoice ID:1}
Invoice Amount - {Invoice Total (Price):5.2}
Date Paid - {date_mdy}

If you have any questions, just reply to this email.

Sincerely,

Ren Ventura, EngageWP
Website/WordPress Developer
Configure the rest of your notifications and you’re ready for the next step.
Connect Form with PayPal
We’re halfway there! Next, we need to get our form working with a payment gateway. Since it’s the most widely used and easiest to set up, I’m going to be using PayPal. You will need to install and activate the Gravity Forms PayPal add-on. Once you’ve done that, the PayPal options you’ll need to access are found under the Form Settings section of your invoice form.
Create a new PayPal feed for the invoice form and enter the required information. Since this initial step is very simple and Gravity Forms provides good help boxes, I’m going to move onto the next part of integrating the form with PayPal.
After you’ve created the feed, you’ll be presented with more options. The most important of these options is the “Payment Amount” field. From this dropdown, you can select “Invoice Total” (our product field) or “Form Total.” Since we only have one product with no options, these two will be the same so it doesn’t matter which one you select. Go ahead and sync up any other field you wish by populating it with the information that should be sent to PayPal and finish up the remaining settings. I suggest not prompting the buyer/client to enter a note or shipping address unless absolutely necessary and to only send notification emails after payment has been received.
Create Single Invoice Template
If you’ve made it this far, you now have an Invoice custom post type with custom fields for client details and invoiced services. You also have a form connected with PayPal to accept payment from the client for the items contained in the invoice. Now, we need to display this invoice and form to the client. To do this, we need to create an invoice template. Since I use Genesis for my development, it’s what I’ll be using to show you the single-invoice.php template I put together for this tutorial.
If you don’t use Genesis, you can still use the important parts but some of the code won’t apply to you (I’ll point out what you can ignore). Your best option would be to copy your theme’s single.php file and rename it single-invoice.php.
To begin, here’s my single-invoice.php template. Take a look and I’ll give a thorough explanation next.
- On line 10, we’re creating a counter variable to keep track of the invoice total and initializing it to zero.
- Lines 13-16 are Genesis-specific and tidy up some presentational things.
- Lines 23-25 create some additional variables: Invoice ID, Client Name and Client Email.
- Lines 29-81 create the invoice container and table. The table has three columns; one for each of the repeatable service fields we created in step two. Each time you add a new service to the invoice, the counter variable ($running_total) is updated to equal the values from all of the included items.
- Lines 85-89 output the form we created in Gravity Forms to let clients pay the invoice. On line 87, you’ll see the shortcode that outputs the actual form. You will need to update this shortcode so it’s specific to your invoice form.
- Lines 93-96 pre-populate the value attribute of the Client Name field with the Client Name custom field’s value. This dynamic population is the feature that will allow us to use the same form for all of our invoice posts.
- Lines 98-102 pre-populate the value of the Invoice Amount field with the value of our counter variable, which is equal to the sum of every service in the invoice. This counter value is formatted appropriately for currency.
- Finally, line 104 wraps up the Genesis code and is only needed if using this template within Genesis. Remove it otherwise.
Send Email to Client when New Invoice is Created
A nice feature to have is to automatically send an email to the client with a link to the invoice as soon as you publish the invoice. This step is not completely necessary but I’ve included some code specifically for it.
Recall that in step two, we created a Client Email field. We added this field for two reasons: we want to associate the client with an email address and to automatically send an email to them when an invoice is created. Since we set the field to be viewable by the admin only, we need to have it dynamically populated so that the field contains an email when it’s submitted. I chose not to have this field dynamically populated via a filter like Client Name and Invoice Amount because, since these invoices are technically viewable to anyone (don’t worry, not many people are looking to pay other peoples’ invoices), the client’s email would be viewable to anyone who was able to access the invoice and skilled enough to know where to look. Therefore, I’d prefer to populate this field via a query string that is included in the email sent to the client. That way, it would be very simple for the client to populate this field (perhaps without even knowing it) and their email would not be visible to anyone who accessed the invoice.
This snippet composes an email to send to the client after an invoice is generated and sends it to the email we entered when we created it. In the email’s body, it includes a link to the invoice and dynamically appends a query string that will populate the Client Email field. Everything is still just as simple for the client but much safer.
Finishing Up
Whew! You think your worn out from following these instructions? Try writing this entire post (over 2,000 words) in one sitting! You’ve now set up a custom invoice system using a simple custom post type, some custom fields and Gravity Forms as your payment processor. Feel free to modify it as you wish. If you come up with any neat additions, please post them in the comments! Thanks for reading.
UPDATE: Since I wrote this post, I’ve further customized my own usage to include things like custom notification emails (see below), personalized invoice messages displayed to the client, data columns on the Edit Invoices page, payment statuses and conditional display of payment buttons, and more. If you need help setting this up on your website or customizing it to your requirements, send me an email.
Can one easily add line items to the invoice after and re-send?
Many thanks for this! ACF is my favorite!
I’m having trouble with the invoice printing on the frontend. I create the invoice (CPT), and I get the email. I then click on the link in the email and the post/invoice shows nothing.
I have the single-invoice.php set up using the code, so I must be missing something.
Also, My PayPal account is in Sandbox for testing purposes.
Hi Ren! Thanks for an awesome tutorial! I’m having an issue where my clients aren’t seeing the invoice total. I can see it correctly when I am logged into the site, but in an incognito window, I cannot. I’ve also tried looking at the url with the client email query string and that doesn’t show the invoice total. Any suggestions as to what to look at? Thanks!!
I’m having this same issue. Any update? I can create and auto-send the invoice but I get a 404 on the front end of the site when I click through or try to view the Invoice as a post. I have single-invoice.php, though I notice there’s nowhere to indicate to the invoice to display using that template. I’m not using Genesis and removed that code…I don’t think I removed anything I shouldn’t have. Hoping someone figured out if there’s a missing step. Thanks.
Have you tried flushing your permalinks?
Gravity Forms has got to be one of my favorite plugins! We are doing invoices for one of our clients and conditional formatting for almost all the others 🙂 Love GF!
Hi Ren,
Great tutorial, thank you for this.
If I may ask, why use filters and not for example the {custom_field:billing_address} merge tag on the GF to prefill the fields?
Thank you in advance.
Best regards,
Spyros
You could likely do that as well. My personal preference is to use code in case I ever want to modify the data in any way, and because I can just look at the code to see everything that’s going on. However, merge tags should work just fine, assuming the form is embedded in the post to which the custom field belongs.
Hi Ren,
Thank you for your amazing tutorial but i have some questions before do these steps.
I have created a landing page with Gravity Forms where people buy my products via paypal and i would to automatically send an email containing the invoice after the purchase. Can I do this using these steps?
Without knowing how your website is set up to sell products, it’s hard to say. However, it seems like you’d need to modify this a fair amount, because you’ll need to generate an email specific to your situation, then send that email that after purchase, instead of after saving the invoice. You could work off this code to give you some of what you want, but it won’t achieve everything (you’ll still need some customization).
I had asked a question a while back that was approved and showed up here for a while, but never got answered and now it’s not here anymore. Anyway, I got the answer elsewhere, from a programmer friend, and I thought I’d share with you so others who have the same problem can benefit. Here is my friend’s response:
This code was added recently, on Nov 26, 2016 according to the GitHub revision history:
// Deny access to the post_type query arg
if ( isset( $_GET[‘post_type’] ) && $_GET[‘post_type’] == ‘invoice’ ) {
wp_die( ‘Unauthorized’ );
}
It looks like the code was added in response to a comment from “Philip” on Nov 23, 2016 where they say the following:
When setting this: ‘publicly_queryable’ => true, then the invoice is actually open to public by adding this to the url: ?post_type=invoice. I know you have set archive to false but people can still see the archive using the ?post_type=invoice. How did you get around that problem?
The problem with this “fix” is, as you can see, the invoices are no longer accessible via the WordPress Dashboard.
The code should only be preventing the people we don’t want viewing invoices from seeing them. For now, I’m going to assume that’s everyone who’s not an administrator. Thus, the code becomes this:
// Deny access to the post_type query arg for non-admins
if ( isset( $_GET[‘post_type’] ) && $_GET[‘post_type’] == ‘invoice’ && !current_user_can( ‘manage_options’ ) ) {
wp_die( ‘Unauthorized’ );
}
That should prevent everyone except admins from viewing invoices.
Great tutorial. I am actually working on something similar and found your post after googling regarding a problem I have.
When setting this: ‘publicly_queryable’ => true, then the invoice is actually open to public by adding this to the url: ?post_type=invoice. I know you have set archive to false but people can still see the archive using the ?post_type=invoice. How did you get around that problem?
Thanks
Very good question. Add this to your code:
hi ren
i have done all of the steps
but now after publishing an invoice, email being sent to client, after clicking on permalink by user, redirecting to invoice` s page , but there` s nothing to show there.
post has been created, but there is nothing to show, no any table or service name or quantity and amount.
please help me.
this is an example of my invoices
*Editor’s note: Broken link removed.
Hello,
Thanks for the write-up. How is the configuration different if you are using authorize.net as processor ?
I am getting a 404 page when i preview the invoice
Thank you!!
Hi, Dave. Getting a 404 on the invoice most likely means you need to flush your rewrite rules. To do this, go to Settings → Permalinks, and click “Save Changes” without changing any of the settings. You should be able to see the invoices then.
I’m so freaking confused sorry Ren,
If we create the fields using Advanced Custom Fields Pro we can skip the first lot of code at the start of the guide beginning with “<?php //* Mind this opening PHP tag" then just carry on?
Hello, Ben. The post uses ACF Pro to create the fields so all the code is still required. Are you having trouble with any step in the process?
Hey Ren!
Everything is working perfectly! Thank you so much for teaching me how to do this where others have failed! love the website and keep up the great work! It’s appreciated! Massive Fan!
Excellent! I’m glad to hear that and I really appreciate the kind words. 🙂
This looks interesting might give it a go. Wondering about the possibility of adding a deposit feature to the invoices? I would need clients to pay for a non-refundable deposit first, then send invoice with remaining balance due. Has anyone done this / is it possible?
– Thanks in advance
Hi, Brian. This would certainly be a more complex setup but it is possible.
What I did was create a relationship between the users and the invoice post type. Then you can create many invoices for a single user. Doing this would allow you to send the deposit invoice, then the remainder.
The other option that I can think of is to add a new input called something like ‘amount’ that would allow your clients to type in the amount they want to pay. Then using ajax or and update button, you could update the amount that goes into Gravity Forms.
I hope this helps!
Are you planning on releasing the updates? “include things like custom notification emails (see below), personalized invoice messages displayed to the client, data columns on the Edit Invoices page, payment statuses and conditional display of payment buttons, and more.”
Hi, Lucas. I don’t currently plan on adding these things to the post because it’s a lot of very detailed work. A couple readers have hired me to do it for them so, for now, I’m just going to keep these things limited to client work. Perhaps in the future, if I get time to revisit this post in detail, I’ll add some further instructions.
You guys are cool. Not sure what I would do without ACF and love to see people getting all web-appy with it. Nice work!
Hey, Eric. I’m glad you appreciated the post! ACF is indeed one of the best WordPress plugins in my opinion and it makes doing things like this exponentially easier.
Thanks for commenting!
Hello, I have follow your indication, but I encoured a problem.
https://db.tt/HY74h45u
The price of 200 EUR is show as 20.000,00 €
But when I click to pay I am asked from paypal the correct ammount.
Can you assist me in fixing this problem?
Hi, Ovidiu. Without seeing your code, I’d guess the issue to be in single-invoice.php (line 54 in the code I provided) where you see:
I know you had to change this since your formatting needs to be different for your currency. Can you post what you did so I can see if that’s where the problem indeed lies?
I have not made any changes. Only the Euro symbol.
Look:
$service_amount = ‘€’ . number_format( get_sub_field( ‘invoice_service_amount’ ), 2 );
Ovi
It’s likely a formatting issue because the tutorial was written to format currency according to USD. You’ll probably need to try something like this (on line 54):
and this on line 102:
Oh super, thanks for your help. It has made the trick. 🙂 Thanks again.
Hi Ren
Tanks a lot this article is really helpful for me right now!
But i’m stucked on the last step because i d’ont know where to add the code giving in send-invoice-email-on-publish.php
And d’ont know if i should create a page called invoice where the client can be redirected?
Thanks a lot for your work, hearing from you soon.
Hi, Omar. The code you’re referring to can go in your functions.php or its own plugin, which is what I’d recommend since this is probably not code you’d want to lose or have to move if you switch themes.
Awesome! thanks again!
Hey Ren
Awesome tut – really well put together.
Here’s a question… I currently have a Grav Form that passes data to a Google calendar for events info booking (client access only)
what they do is create a ‘provisonal’ booking and in that process they get an estimate. Once the event is near they review and adjust quantities of items booked. I wondered if you knew of the possibility of taking an existing gravity form submission – allowing it to be edited and then once confirmed and re-submitted, it then passed that booking data to your invoice system?
Hope that makes sense :O)
I am exploring ways of having this solution and all within WordPress, you seem pretty clued up so I thought I’d ask the question 🙂
Hi, Mark. I see what you’re saying. There currently isn’t anything to let the front-end user modify a submission in that way. However, Gravity Forms 1.9 is due out soon and it has a feature for saving progress (“Save and Continue”) that may help you. You could do something like dynamically generate the estimate and then let them come back later to complete the checkout. However, a submission won’t actually be created until the form is fully submitted, meaning you won’t be able to view or edit the information. For more info on this feature, I’ve included a link below.
If you need to have this type of multi-step process, you might be able to do something with custom post types. You could create a new post each time someone submits the form, include a form in the post that is dynamically populated and grant the user access to the post for form submission at a later date. This is somewhat similar to what I did for creating the invoice system.
Hopefully that helps.
https://docs.gravityforms.com/save-continue-gravity-forms/
Awesome thanks for the help! You’ve gotten me thinking now!
At present, I have a multi step form and so saving and going back would be awesome.
Totally never thought about creating a post and having a form dynamically populated from the initial entries!! 🙂 – you mean a second grav form within the post right? pulling its info across from the first entered information and then perhaps giving access to amend the values and then confirm? Once done, re-post the entries to Google calendar again using another ZAP and then have the custom post stuff also create the invoice using your magic??? make sense? doable?
Just wondering how best to offer the updating of the entries (in a super simple way) that does not require they learn the management of WP backend- client is not that good on the web as it is 😉
Looking at custom post types I see the one you mention in this article and also the Toolset/Types suite as options – would you say the above could be done using the logic I explain and either of these tools too? If so which?
http://wp-types.com/#buy-toolset
Sorry for the gazillion questions 😉
Create a form to publish the CPT and then another form to include in the posts for checkout. Populate the second form dynamically with post meta, which was set when the user submitted the first form to create the post. Once the second form is submitted, you can do whatever you want with it (i.e. send to Google, etc).
Personally, I’d stick with using code, especially if it’s a client site, but that’s up to you. I like to give clients as few interfaces as possible to avoid messing anything up. If you use a plugin, though, you can always hide it from other users.
Regarding the use of the Toolset suite, I’ve only used Types (I prefer Advanced Custom Fields) in the past so I can’t advise on using the other components, such as Cred and Views, to set any of it up. I’m sure at least most of it’s possible but I prefer to stick with PHP and Gravity Forms because it’s a standard tool for my development.