UPDATE: The plugin from the tutorial is now available on the WordPress plugin repository – After Comment Prompts
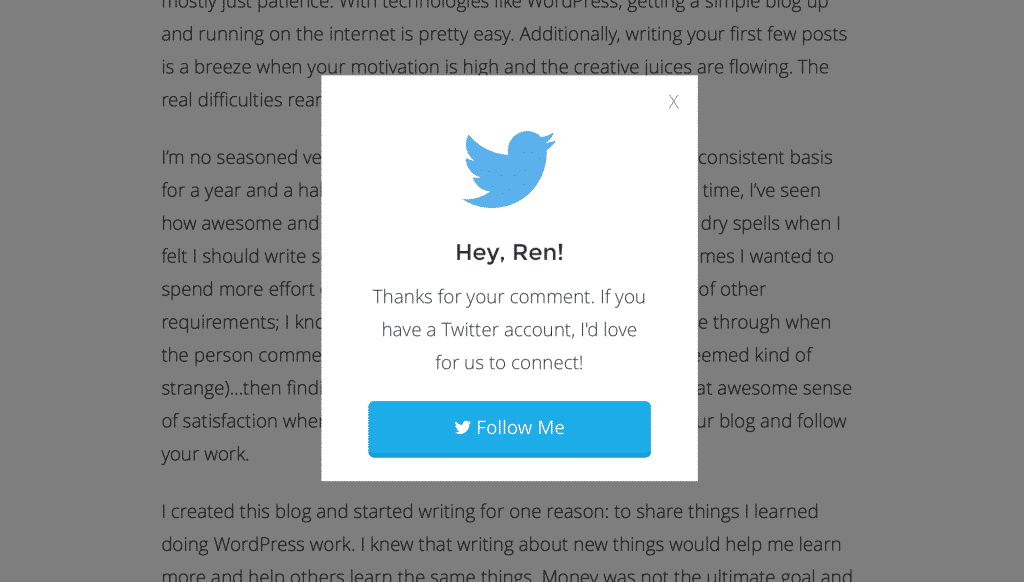
A few months ago, I wanted to create a way to prompt my readers to follow me on Twitter after they leave a comment on one of my posts. There are already a few solutions available to do this sort of thing (like the Yoast Comment Hacks plugin) but not one that did things the way I wanted, which was redirecting a user to the comment’s permalink, like normal, and displaying a modal window with my message, as in the image below.

I also wanted to make it easy to customize, so I added a setting to display any type of content and customizer options to adjust the design of the modal and overlay.
I put this all into a plugin that is available on GitHub. Instead of walking you through all of the code, I’m going to walk you through the main purpose: doing something after a user submits a comment on a post.
The Code
The most important part of this functionality is the comment_post_redirect filter. This runs after a comment has been submitted and it modifies the redirect URL (to where to user is sent after submitting). The function we’re tying to this filter accepts two parameters: $location and $comment.
/**
 *	Redirect to a custom URL after a comment is submitted
 *	Added query arg used for displaying prompt
 *
 *	@param string $location Redirect URL
 *	@param object $comment Comment object
 *	@return string $location New redirect URL
 */
function comment_post_redirect( $location, $comment ) {

	$location = add_query_arg( array(
		'comment_added' => $comment->comment_ID
	), $location );

	return $location;
}
Specifically, this code is appending a query argument to the default URL. The default URL is the post’s permalink with the ID of the comment’s container. This means that, by default, the user is redirected to view the comment he or she just submitted. If you’ve ever commented on a WordPress blog, you’re likely familiar with this process.
We are adding a custom query argument so that we can check to see if it’s set and show our modal prompt accordingly.
/**
 *	Add the content for the prompt modal
 */
function add_prompt_content() {

	// Bail if the functionality is not enabled
	if ( ! after_comment_prompts_is_enabled() ) {
		return;
	}

	// Bail if comment_added query arg is not set or is something other than a number
	if ( ! isset( $_GET['comment_added'] ) || ! is_numeric( $_GET['comment_added'] ) ) {
		return;
	}

	// Bail if the modal is disable for logged-in users
	if ( after_comment_prompts_is_hidden_for_logged_in() && is_user_logged_in() ) {
		return;
	}

	// Comment object
	$comment = get_comment( $_GET['comment_added'] );

	if ( ! $comment ) {
		return;
	}

	// Commenter's first name
	$author_names = explode( ' ', $comment->comment_author );
	$author_fname = $author_names[0];

	// Message setting value
	$message = after_comment_prompts_get_settings()['message'];

	// Replace merge tags
	$message = str_replace( '{commenter_name}', $author_fname, $message );

	// Final output
	$output = after_comment_prompts_get_modal( $message );

	echo apply_filters( 'after_comment_prompts_modal_output_comments', $output, $comment, $message );
}
Next, we’re checking to see if the comment_added query argument is set. If it’s not, then we’re not going to run anything further. Otherwise, we’ll continue.
Assuming the comment_added argument is set, we use the value of that argument to retrieve the comment object. From the comment object, we get the author’s name and the default message we set in the plugin’s settings. Then, we replace the {commenter_name} merge tag with the author’s first name and output the message using the modal script and markup created elsewhere in the code.
Summary
Feel free to take a look at the rest of the code if you want to know more about how it works. If you’re not into code, just download and install the plugin and configure you’re settings.
Great stuff! happy new year.. 😀
Likewise!
Hey Ren,
Landed here after quite awhile…great to see you’re pushing the envelope for Genesis customizations. As always! 😀
Thanks, Avinash!
Hey Ren,
I’ve been running this on my local setup and it’s a beaut. 🙂
Got a question, why did you give each line it’s own i.e. block level element? Makes it easier for me to style with a class but just curious as to why…
Also, why not just use Twitter intents for the follow button? I’m guessing you wanted customization…but, again, thought I’d ask. If you did, that’s a good call cos I’m finding that styling the official Twitter Follow button is a right nightmare.
P.S. You might want to change the ‘X’ used to close the popup to ⓧ. Much sleeker…
Hey, Avinash. I’m glad you’re liking it!
For your first question, I’m not totally following. My apologies. Could you clarify what you mean by “each line?”
Regarding the use of actual Twitter buttons, I definitely wanted to maximize flexibility. The reason the plugin has its own WYSIWYG editor is to allow you to display any type of message, not just follow buttons. For example, you could display a Buy Now button, an email opt-in, etc. I used the Twitter button as an example, but it demonstrates the flexibility. Rather than dealing with the pre-styled Twitter intent button (I agree, this is a major pain in the ass), you can add your own markup for a button that goes with your theme.
Last, I used a plain “X” for the close button to keep it simple. You can actually change this quite easily, though. I made the close button filterable, so you can use the following snippet to modify it:
/** * Change the X close button to a Font Awesome icon */ add_filter( 'after_comment_prompts_close_modal', 'after_comment_prompts_close_modal_icon' ); function after_comment_prompts_close_modal_icon() { return '<i class="fa fa-times"></i>'; }Great stuff Ren! What a smart way to engage with the site visitors? The code well crafted as well. I will give it a shot. Thanks for sharing awesomeness.
Hey, Susanta. You’re very welcome! I’m glad you liked it and I appreciate the feedback.